Showing posts with label scratchbuild. Show all posts

Tuesday, May 2, 2017

Japanese Billy dollhouse- Naniwa's Skewer (Kushi katsu) Shop

This is my first official Billy Dollhouse. The Billy Dollhouse Company in Japan makes ready-to-assemble dollhouses. The small kits sell for 3000 yen ($27.00 USD), and the larger kits retail for 5300 yen ($48.00 USD). They have a website and they sell online, but they do not sell directly to countries outside of Japan. Customers in the US can buy them from Amazon.Com, for about $10 above retail, which isn't too large a markup.

They're are very similar to the made-in-China DIY kits that I'd bought before. But in Japan, everything is more expensive, but generally, you get higher quality for the higher price. This kit cost me 5,300 yen ($48.00), which is about twice the cost of similar Chinese kits. It is called "ナニワの串カツ屋さん", which Google Translate says is "Naniwa's skewer/kushi katsu/kushi age shop". I had seen samples of the finished kits at Volks Akihabara, so I knew they are slightly smaller than 1:18, perhaps more like 1:20 or 1:24 scale.

Parts inventory after opening the kit
One thing that I wasn't very enthusiastic about was Billy's use of foamboard and cardboard sheets to make a few parts. You're supposed to cut out the parts yourself, using the full-sized templates in the instructions. Personally, I just don't like foam board because of painting issues and gluing issues. I refused to build furniture with cardboard, so I did part substitutions for this build.

The instructions are completely in Japanese, with zero English. Since I'd done these kinds of dollhouses before, I made educated guesses about how to assemble it by looking at the diagrams, as well as watching YouTube videos by the user HMS2.

Since this dollhouse shop is sub-1:18 scale, my plan was to modify it to bring it into proper 1:18 by using 1/4" x 3/4" x 8" basswood strips to boost the height of the walls. The back panel of the shop needed to be replaced, so I used a thin MDF backer board from a Daiso picture frame.


Day 7: 

Here's an in-progress shot of the Billy DIY dollhouse project. This photo shows how to increase the height of a wooden dollhouse in order to bring it in-scale with larger figures, in this case going from 1:20/1:24 scale to 1:18.

Day 7 of dollhouse construction
Clockwise from the top:
  1. Main building: The 3/4" basswood strips can be seen on the outside. On the inside, the booster strips had already been covered-up with a wide baseboard, which is a textured paper strip. The outside will eventually be covered up with siding.
  2. Doors: Since the building height is being increased, the doors also need to be taller. There's a 1/2" basswood strip on the bottom of the door. Once the door is painted, the booster will not be visible.
  3. "L" shaped counter: The instructions called for cutting the countertop from foamboard and the cabinet from cardboard. I completely replaced all of it with a hand-cut basswood countertop and very thin leftover MDF from a picture frame backing board.
  4. Small outdoor counter: Also has a 1/2" basswood strip to boost the height. The outside is covered with a strip of bamboo mat, replacing the flattened corrugated cardboard strip mentioned in the instructions.
  5. The original stools actually fit Rement Pose skeletons pretty well. I decided to designate them as "kid's stools". Then I made 4 slightly larger ones from scratch (same style) for the "grownups". I found some excellent "textured cloth" origami paper at Daiso, so I used that to replace the original paper chair covering.
  6. The yatai (street food stall) cabinet also needed a height boost to make it proportional to the new height of the building and furniture. I added a 1/2" basswood strip, and replaced the intended cardboard counter with thin MDF. All of the changes will be invisible once the cabinet is painted.
The Billy dollhouse kit includes 3 small bottles of paint. After trying them out, I'll say that the paint is definitely unlike the craft acrylic paints that we have in the US. The Billy paints are water based, but they are semi-transparent, semi-gloss, really quick-drying and have a lot more "stick" to them. They adhere to the surfaces very well- almost too well, because it was difficult to wash the dried paint off of my hands! I had to use a pot scrubbing sponge.


Day 15: 

Well, the Billy dollhouse is still a work-in-progress. I've completed the building, interior furniture and the yatai (street food) cart, as well as the small outdoor counter. Everything's painted and nicely covering up all of the height booster strips.

Day 15 of dollhouse construction
Yup, bringing the scale to 1:18 was a good idea. Here's what it looks like with figures: Boss Fight Studio skeleton, Pose skeleton, and manning the yatai- a "125mm full-action Kamen Rider SAGA Kuuga" gachapon figure, fresh from Japan. The samurai armor suit is another gachapon capsule toy.

But there's NO FOOD! I'll be working on that over the next few days. I know, a restaurant looks kind of pitiful with hungry customers and no food.


Day 21: 

We have food now! and BEER! The food is made in the most unexpected way: cutting tiny pieces out of foam board and putting a thin wire through them. Then painting them with the included high-tack orange paint. Then coating them with glue and rolling them around in sand. And a final coat of orange paint. They really do look good enough to eat.

Day 21 of dollhouse construction
I'm approaching the completion of the dollhouse kit. Right now, the awning is only taped-on because I'm waiting for some LED lights from China. Eventually I'll have light-up lanterns under the awning.

Additional part substitutions:
  1. The flags and curtains were originally printed paper. I scanned the paper sheets, printed them on iron-on paper and ironed them on cloth. Cloth has far superior function and aesthetic.
  2. The beer mugs were supposed to be cut from flexible aquarium tubing. But, the resulting mugs would be seriously out of scale, and the material is difficult to glue. I replaced them with mugs cut from a BIC pen and some wire for the handles. 
  3. The instructions called for food trays to be flat cardboard rectangles covered with foil, with the food placed on top. For practical reasons, that design wouldn't work in real life because the excess oil would just flow onto the countertops. I replaced them with proper food trays with fold-up sides, cut from silver-colored cardstock.
  4. I used heavy textured tan cardstock to make the chopstick cups 
  5. Things were getting crowded on the base, so I increased the size of the base by 3/4" by gluing on basswood strips. This would be covered up by the paving stones, eventually.
The sidewalk is next on my list to do.


Day 29: COMPLETION! 

I'm done! This project took 4 weeks. I could have done this faster if I stuck to the instructions and made it exactly as-is, but it was always my intention to increase the size to 1:18 scale, and to do a deluxe version of the kit.


This pic is taken from the side, and shows the following improvements:
  1. Paving stones made from egg cartons, trimmed, painted, sealed with clearcoat and grouted with spackling paste.
  2. Added a samurai armor gachapon. I found this in a gacha machine at Yodobashi Akiba, on the same night that I bought this dollhouse kit at Volks Hobby Paradise Akihabara. I initially wasn't sure what to do with it, but when I did a dry fit of it next to the kushi katsu shop, something clicked and I liked the look.
  3. Created a bamboo pot for the plant. The instructions were vague about what to do with the plant. Was I supposed to drill a hole in the base and just stick it in? I had leftover bamboo from a bamboo mat used in an earlier project, so I made a pot by wrapping heavy paper around a marker to make a cylinder, and then wrapping a strip of bamboo mat around it.
  4. Made Japanese paper lanterns instead of using styrofoam balls.
Day 29 completion of dollhouse construction


WHEN THE LIGHTS GO DOWN IN THE CITY

It took 25 days for my LED lights to arrive from China. A dozen of them cost only 11 cents (US). The time spent waiting wasn't wasted. I was working on some lanterns, because, dammit, I wanted the lanterns to light up. The original instructions and materials intended for them to be made from styrofoam balls covered with paper, but if I made them that way, I would not be able to insert LED bulbs inside.

So, I ended up making them old-school style: by winding cloth-covered floral wire around a marker and shaping to coils by hand to taper at the ends. Then I covered them in Japanese washi paper. I added a small wire handle at the top, so I could hang them from hooks on the roof.

I wired the LEDs in parallel. They were 3v each, at 20mAh. Since there's 5 of them wired in parallel, they could all run on a single CR-2032 battery, and I had several battery boxes in my stash. It technically works, but a load of 5 LEDS is a bit much for a single coin cell, so I'm expecting the lights to run down the battery pretty quickly.

Kushi Katsu shop illuminated at night with lanterns
Lighted dollhouses look entirely different at night. The photo here is actually a pretty good replica of what it's really like to stop at a kushi katsu shop at night. The Japan I saw (Tokyo) is all skyscrapers, multi-floor mega shopping complexes, bright lights, traffic jams and trains. These kinds of traditional shops still exist in places like Shibamata and Osaka. I love Japan! Maybe on my next trip, I'll venture beyond Tokyo.


FINAL EVALUATION OF BILLY DOLLHOUSE KIT

Now that I've completed my first Japanese Billy dollhouse kit, I can make an objective evaluation of them.

They're rather expensive for what you get. This kit is one of their largest and most expensive ones at 5300 yen. Although the MDF was measured and cut very precisely and finished very well, the Billy dollhouse company seems to have an aversion to making smaller parts out of wood. Many parts, such as countertops and cabinets were supposed to be cut from foam board or cardboard. The roof pieces were supposed to simply be glued at an angle, when they should have wooden triangle-shaped supports. And items that should be cloth are printed paper. I did an awful lot of part substitutions.

The kit did not come with any light bulbs and was never intended to light up. I fixed that (of course) and kicked in about $10 for additional materials (wood, MDF, various types of paper, cloth, Plastruct rails, floral wire, lights).

Manufacturer's photo (left) vs actual dollhouse. A good match
Since I was on vacation in a foreign country and very determined to spend money, that justified the purchase. It's a souvenir of Japan, with some cultural and historical significance, as well as a hobby kit. This was a fun and interesting project, and now it looks like it came from a $48.00 kit. But in its original form... maybe not. I am not certain if I would purchase another Billy dollhouse kit. The materials are rather basic, and I believe I can construct a similar dollhouse from scratch for a fraction of the cost.

Sometimes I really think that toy skeletons have a better life than I do

RELATED PAGES:

Tokyo's Akihabara Again and Gacha-Love, 2017
"Captain Bar" DIY Dollhouse becomes Pirate Bar


Tuesday, October 18, 2016

Pirate Hats and accessories (for action figures) DIY Tutorial

It's Halloween time and everybody, including your action figures, wants to be a pirate! Arrr matey! If only pirate stuff were easily and cheaply available for any figure!

My collection of toy skeletons spend a lot of time wishing they were in Disneyland (like I do), so while I was making my Pirate Bar dollhouse, I also needed to come up with some pirate hats. An online discussion mentioned Assassin's Creed figures and accessories, and of course, there's the authorized "Pirates of the Caribbean" action figures based on the movies, but I am a cheapskate at heart, unwilling to buy figures just for the sake of stripping off their accessories, plus I have customizing skills aplenty. I wanted to try making my own pirate hats.

I tried cloth and leather, with disappointing results, so I tried Sculpey polymer clay. It was shockingly quick and easy and I really liked the results, so Sculpey was definitely a winner!
Proof of concept- making pirate hats

PIRATE HAT SCULPEY TUTORIAL


Step 1: Buy a package of Sculpey. You can also buy a multi-color pack at Michaels and download their 40% off coupon.  Put a sheet of wax paper on your work area, and cut off a slice or two of Sculpey.
Step 1: Buy Sculpey. Slice.
Step 2: Roll the Sculpey slices into a ball, making sure that all of the bits and pieces mold together. Flatten the ball into a pancake. Use a rolling pin or a nearby can of WD-40 and roll the pancake to 1mm in thickness. 1/16" is acceptable for larger action figure heads.
Step 2: Roll into a ball and flatten it
Step 3: Making a hat form speeds up production considerably. This is a wooden bead that happens to be the right size, mounted on a bamboo stick.
Step 3: Make a hat form
Step 4: Put the flat, round Sculpey on the hat form. Press down slightly, and the hat crown will gradually form.
Step 4: Put Sculpey on form
Step 5: Refine the hat shape with additional pinching. Straighten out and trim the brim.
Step 5: Refine the hat shape
Step 6: Fold up 3 sides of the brim. It's surprisingly easy to make that perfect colonial-era tricorn hat!
Step 6: Fold up the brim
Step 7: Gently remove the hat from the hat form, and put it on a piece of foil. Place in the oven at low heat (about 200 degrees) for about 5 minutes. Babysit it so it doesn't burn.
Step 7: Bake!
Step 8: When it's fresh out of the oven, the hat will be hot! Put it on your action figure, and it will mold itself to the figure's head shape as it cools. Try not to burn your fingers doing this step.  If the hat cracks, just make another one. Once the hat cools, you might want to paint on some matte acrylic clearcoat to provide a barrier, in case you're worried about a chemical reaction between the Sculpey and your action figure.
Step 8: Mold to exact figure's head
Step 9: Make a lot more! It takes about 5 or 10 minutes to make each hat. This method is really inexpensive, and you can custom make each hat for a specific head, without waiting for toy companies to manufacture them.
Disneyland, here we come! Arrrr!

PIRATE CUTLASS TUTORIAL


For a minimal investment, or just digging around in the tools and parts drawer, it's quick and easy to manufacture your own Pirate Cutlasses.

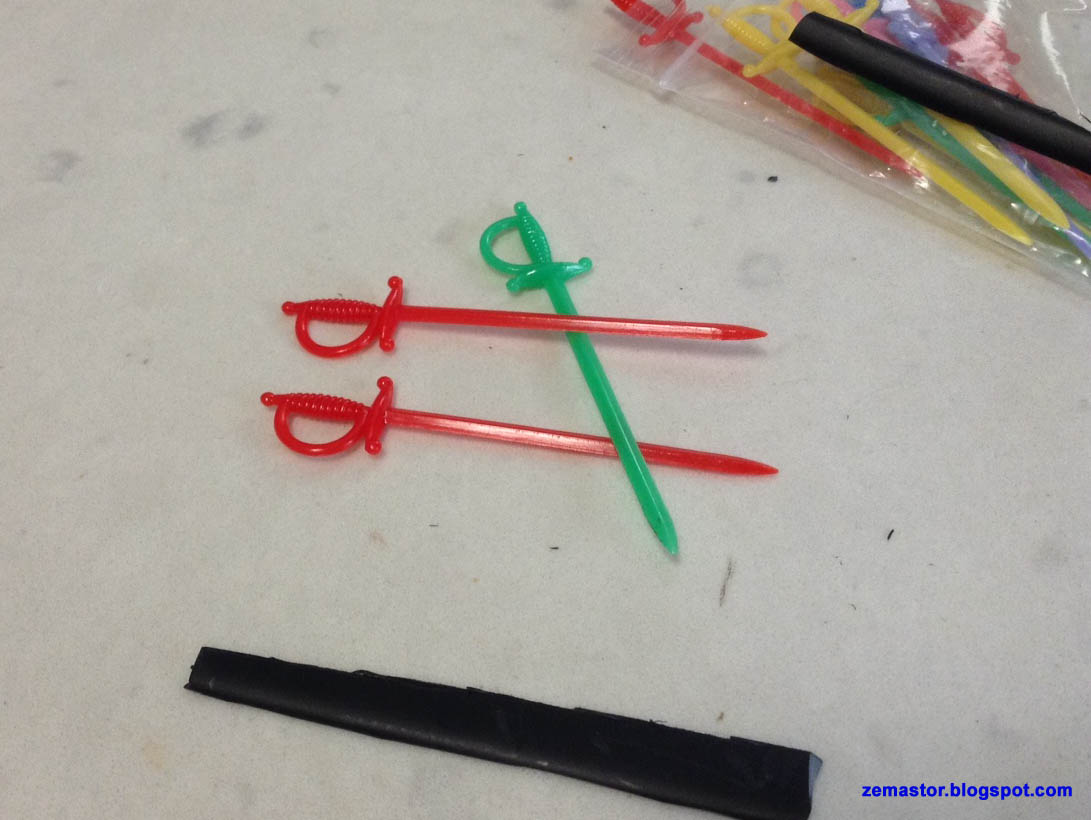
Step 1: Buy a package of plastic sword cocktail picks. You can get them at any party supply store, or even the dollar store. Then locate a cheap or free source of ABS plastic. I used an old Macbook tray. The plastic should be thin enough to trim with heavy duty kitchen shears.
Step 1: Buy sword shaped cocktail picks and find some ABS
Step 2: Use a pair of wire cutters to cut off the plastic sword blade. Then cut your piece of ABS to the shape of a cutlass blade. Use sandpaper to finish the edges. If you need a thicker blade, cut out 2 identical cutlass pieces from the sheet, and glue them together. Carve a peg at the bottom of the cutlass blade.
Step 2: cut off sword blade and shape replacement cutlass blade
Step 3: Use a power drill and drill a small hole in the party pick's sword hilt.
Step 3: Drill hole in hilt
Step 4: Use 5 minute epoxy to glue the new blade into the sword hilt. The peg-in-hole will give you a much stronger joint than simply gluing the 2 pieces together without any reinforcement.
Step 4: Glue new blade into hilt
Step 5: Paint the cutlass with your favorite primer. This step is optional.
Step 5: Paint with primer
Step 6: Paint the cutlass with its final color and allow it to dry. The use a matte clearcoat.
Step 6: Paint with final colors and clearcoat


RELATED PAGES: 


"Captain Bar" DIY Dollhouse becomes Pirate Bar
Miniature DIY Pirate Gachapon Machine
Polymer clay miniature coins for dioramas
Greek Mythology Vitruvian H.A.C.K.S. action figures
The Search for Dokuroman
October Toys Skeleton Warriors
A Collection of Toy Skeletons

Monday, October 17, 2016

"Captain Bar" DIY Dollhouse becomes Pirate Bar


It's been about a year since my last dollhouse project (Jazz and Blues Club) so I've been itching to do another building. Some of the more recent DIY offerings were "Fried Chicken and Beer", "Free Time Coffee" and "Sakura Sushi Bar", all available on Ali Express and Ebay. What eventually won out was "Captain Bar" (missing the possessive "'s"),  a tiny shack that could be modified into a "Pirates of the Caribbean"- inspired skeleton pirate bar!

I ordered it from ebay for about $20, with shipping from China included. It took a bit less than 2 weeks to arrive. The box got banged-up a little, but the contents were fine.

"Captain Bar" DIY dollhouse box
One thing to note: There is no "brand name" anywhere on the box, or on the instruction manual. The box side panel mentions "Guangzhou Hongda Craft Co.", and it's likely that it's from the same company that makes "DIY Cuteroom" and "Know Me" dollhouse shops. The kit is not of Pakitoy quality, but is a definite step up from their original 2009-era European Miniatures Shop series. I would say that it's worth the $20.

Here's a look at the parts. The kit includes 3 LED lights, all connected to a small circuit board with 3 button batteries. The parts quality is generally OK, although the side walls were slightly warped. A clothes iron and a brick solved that problem. It comes with a bottle of white glue, but since the quality of the glue is unknown, I stayed with my tried-and-true favorite glues: Elmer's Wood Glue, Aileen's Tacky Glue, Loctite's 5 minute 2-part Epoxy, and E-6000. Different glues for different purposes.

"Captain Bar" DIY dollhouse box contents
I knew from the beginning that the building height of 6" was too short, so I planned on increasing the height of the building by 3/4", which would make it look less claustrophobic and also bring it to 1:18 scale.

It took a while for me to get started. I got sidetracked by other projects, writing other blog pages, absorbing new toy skeletons and new gachapon for my collection and playing pirate video games like Tropico 2 and Sid Meier's Pirates.
  
Here are some photos of the mid-point completion of the Captain Bar. I placed in some 1:18-ish skeletons to check for fit, and they ended up looking like they were having a lot of fun checking out their new place of business prior to opening.

Rement Pose and Boss Fight Vitruvian Hacks skeletons
Dokuroman is shocked at the size of the gachapon treasure chest.
Other mods:
  • Replaced the printed paper "wood" wallpaper with actual wood paneling.
  • Replaced the printed paper "stone" floors with stones cut from an egg carton, painted, varnished and grouted with spackling paste. This is a common dollhouse-making technique for exterior bricks and paving stones.
  • Replaced the beer mugs with pieces cut from a Bic pen, instead of using the included aquarium tubing.
  • Replaced the solid block treasure chest with a handmade wooden one that opens and closes and contains a pile of pieces o' eight.
  • Increased the height of the furniture by cutting new panels in plywood. Also re-did the barstools with a larger seat and made them higher to match the new furniture height.
  • Added 2 additional bottle racks and made more bottles.
  • Used a wood chisel to taper the wood barrels. The original instructions were to simply glue a stack of concentric discs together and I thought that looked awful.
  • Made a bunch of pirate cutlasses by cutting up a Macbook plastic tray, shaping them into a cutlass shape and gluing them to the hilts of cocktail party swords.
  • Pirate skull wall decor was made from a skull from a Halloween bracelet cut in half. Crossbones carved from basswood and painted.
Here are some photos of the Captain Bar (being renamed to "The Rusty Cutlass") at a later stage of completion. The photo taken at night looks pretty dramatic with a transparent Jade green October Toys skeleton.

"The Rusty Cutlass" Pirate bar at night
The instructions were vague about what to do with the wiring, circuit board and battery, so I built a "stone" chimney on the outside to hide all that stuff.


For some reason, a lot of the newer, inexpensive made-in-China DIY dollhouses do not have fronts, and a storefront is at least 50% of the charm of a dollhouse-sized shop. So, I cut up an MDF clipboard to provide a storefront. The same clipboard also provided the sides for the storefront piece as well as the 3/4" building height booster.


The larger pirate skull was a ceramic bead from the hobby store, and the smaller skull was cut from a Halloween skull bracelet.

The original store signage was simply a piece of printed paper to be pasted on wood. That wouldn't do, so I took a lot of influence from Disneyland's 3-dimensional attraction signs like "Peter Pan's Flight" and "Splash Mountain". I briefly considered making the scroll of heavy paper, or wood putty, but in the end, I used Sculpey polymer clay for its predictability, quick setting time and ease of use.


Outside, I placed my 2 pirate gachapon machines. I finally found a proper context in which to display them!


On the inside, I made use of a samurai sword gachapon. Since it did not have a removable blade, I made a small plaque and mounted it, to make it look like the pirates picked it up as a souvenir on a sailing trip to Japan. The posters were scanned from one of my books, "Pirates of the Caribbean: From the Magic Kingdom to the Movies".


RELATED PAGES: 

Pirate Hats (for action figures) DIY Tutorial
Miniature DIY Pirate Gachapon Machine
Polymer clay miniature coins for dioramas
Greek Mythology Vitruvian H.A.C.K.S. action figures
The Search for Dokuroman
October Toys Skeleton Warriors
More Gacha-Love, shipped from Japan!
A Collection of Toy Skeletons


Thursday, June 16, 2016

Spooky Kooky Dungeon Dioramas and Toy Torture Devices


I'm having some evil, evil fun with Spooky Kookys. When I was in the process of writing about the Spooky Kooky boxes and packaging, I got to thinking that I had enough pre-existing pieces to set up a diorama.

Here's the box inspiration: Spooky Kooky jiggler box:

1985 Topstone box. Photo by Mac McDermott/Facebook

SPOOKY KOOKY DUNGEON DIORAMAS

Here is the first of the dungeon dioramas, based on the illustration of the box above. These Spooky Kookys are a mix of originals and re-issues, depending on which ones were on hand, and weren't wearing other clothing (I do a lot of customizing).

Spooky Kookys hanging in a dungeon
Just the Kookys hanging against a wall isn't all that interesting, so here's what the diorama looks like, with the addition of October Toys' Skeleton Warriors figures as their captors. The skeletons just happen to be compatibly sized, making it possible to merge the two worlds: 1971 Spooky Kookys and 2015 Skeleton Warriors.

I also added an additional Kooky, who looked very, very filthy because his previous owner tried to paint him and I had not been able to completely remove the paint. I also added handmade stocks.

Skeleton Warriors holding Spooky Kookys in a dungeon
The second of the dungeon dioramas adds The Rack:

Skeleton Warriors demand to know where the treasure is hidden
Spooky Kooky pleads with the skeletons, "Don't turn the wheel!"
Spooky Kooky sings like a canary
No toys were permanently harmed in the making of these dioramas!

BEHIND THE SCENES

rack on ebay
Back in 2012, someone on ebay was selling a Spooky Kooky jiggler tied down to a torture rack. At the time, I didn't have $50.00 in the toy budget to throw around, so I passed on it. But, I stupidly didn't take down the seller's name. All I copied was a thumbnail of the item (left), which I thought was a full sized image.

Once I had money in the toy budget, I searched for it, but couldn't find it again. That meant I had to build one myself from scratch. I was also inspired by the beautiful, handmade wooden miniature guillotines and, um, other similar types of machines on the DreadWilliam site. My rack is scaled down to 7", because the intended toy victims are between 4" and 5" tall.

The local hobby store had some benign hardwood wagon wheels and wooden thread spools. The rack bed was plywood that was sitting around in the garage. Some spare baseboard molding was also conveniently in the garage too. I ended up buying some 1/4" square dowels made of maple, because I needed hardwood for the supports and the mechanisms.

All in all, it cost me about seven dollars for supplies and parts.

The Rack work in-progress
I carved a ratchet and pawl mechanism, because the prisoner will probably spend weeks on the rack, and I didn't want the spools to unwind overnight. And, the ratchet makes a really satisfying click when you turn the wheel. I added a small wooden hammer to the pawl, in order to weigh it down and also make it easier to disengage it.


I made some recent modifications to the leg clamps. The original wooden latch didn't hold the leg clamps down tightly enough, so I removed the latch and used the simpler and more efficient peg-in-hole method. The peg has a chain and a holder so it won't get lost.

Experimental video of The Rack in action (shot using my iPad) using a 50 cent gumball machine stretchy skeleton. For educational purposes, of course. If you're squeamish, don't play the video.


The wooden stocks were also scratch built, from various scrap pieces of wood I had lying around. It opens and closes, and was tailor-made to fit a Spooky Kooky. The padlock is not functional. It was originally a metal charm from a craft/fabric store. The wooden peg-on-a-chain is what really locks the stocks.


The dungeon setting is made of cardboard and Home Depot vinyl flooring samples. The stone walls are pieces good quality corrugated cardboard, and covered with rectangles trimmed from various cereal boxes, all painted and varnished. The dungeon door looks 3-D, but it's just cardboard, with somewhat realistic-looking door hardware made from scrapbook paper and dry-brushed to give the illusion of wear and age.
The dungeon is not a permanent diorama, and can be broken down and stored flat, as needed. It can be reassembled in only a few minutes.


RELATED PAGES:

Imperial Toys Spooky Kooky jigglers, Part 1
Imperial Toys Spooky Kooky jigglers, Part 2
Fun with Spooky Kooky jigglers! Playing "Hogan's Heroes"
A Collection of Toy Skeletons