Showing posts with label Pirates of the Caribbean. Show all posts

Tuesday, February 14, 2017

My Disneyland/Disney World "Pirates of the Caribbean" memorabilia

This is a selection of some of my "Pirates of the Caribbean" memorabilia, some of them very recent (Feb 2017) and some of them vintage pieces from my childhood in the 1970's.

Disney World, Orlando Florida, Feb. 2017


"Pirates of the Caribbean" Attraction Figurines

It's been a while since I'd bought any Pirates souvenirs from the Disney Parks giftshops. Nothing had caught my eye in the past few years. Too generic, or too heavily-based on Captain Jack Sparrow from the movies. On my latest trip, this set got my attention. These figures are characters seen on the actual ride! None of this movie nonsense, or Mickey Mouse wishing he was a pirate. These are the real deal! Yes!

"Pirates" figurines in box
Clockwise from upper left:
1) "The Pillager" skeleton pirate from the "Dead Man's Cove" scene early in the ride. Normally seen pinned against a rock with a cutlass stuck in his chest. The figurine is slightly different from the ride figure because it's wearing pants and boots- probably a manufacturing necessity because a barelegged and barefoot skeleton would be too delicate for intended customers, including kids.
2) Adorable parrot pirate figurine- the spittin' image of the one that's perched at the front entrance of the attraction at Disney World.
3) "The Redhead" from "The Auction" scene. She really doesn't seem to mind being auctioned off to the highest pirate bidder. The figurine is true to the original Marc Davis concept sketches.
4) "The Pooped Pirate" from "The Chase" scene. He's shown in his current incarnation with a key and a treasure map, looking for Captain Jack Sparrow (and not a girl hiding in a barrel).
5) "The Auctioneer" from "The Auction" scene. He's also very true to the Marc Davis concept art. In particular, his caricatured face is wonderfully expressive.
6) The "Treasure Keeper" from the "Sacking the Town" scene. He's the menacing pirate in charge while his underlings dunk the mayor in the well. The figure's footwear differs from the ride figure. The toy version is wearing heavy boots while the ride figure wears striped socks and pilgrim shoes. This is also probably a manufacturing necessity to make a sturdier figure.

They're 4" tall and have zero points of articulation, but they have the true flavor of the ride. The set of 6 of them is only $16.99- meaning less than $3.00 per figurine. In this day and age, it's a bargain. Their size makes them reasonably compatible with Boss Fight Studio, Kaiyodo Dokuroman and Rement Pose skeletons.

Size comparison w/ Dokuroman, Boss Fight V-Hacks and Pose skeleton
I'd certainly like to see Disney Parks continue this line of exclusive Pirates merchandise based on the ride. One can only salivate over the idea of a complete line of 1:18 Pirates figures! Just think- with a large plywood sheet, lots of paint, paper mache, basswood, wooden dowels, LED lights... what it would be like to have your own 1:18 "Pirates of the Caribbean" in your home!


"A Pirate's Adventure" Treasure Maps

I guess these qualify as souvenirs. They're maps from a fairly recent new attraction called "A Pirate's Adventure - Treasures of the Seven Seas", only at Disney World. They're 11" x 17", on high quality paper, well-illustrated in full color and have some nice touches, like "aged" and "tattered" edges.


It's basically a self-paced treasure hunt. You enter a little shack at the edge of Adventureland, touch your admission ticket card to a well-disguised touchscreen and pick up a map. The screen gives you instructions on where to start your hunt. Each map has different symbols, and you're supposed to hunt for the real-life matching symbol on various props hidden in plain view in various locations in Adventureland.

When you find the match, you touch your card against the skull, cannon, furniture, etc. and it triggers some sort of physical animatronic action, such as a cannon firing, or a ship-in-a-bottle battle, and some dialogue and the next clue. When you complete the map, you can get it stamped, and receive a "collectable" (ha ha) Treasure Card. You may continue your quest with another map. After completing several maps, you can get a Fast Pass for the "Pirates of the Caribbean" ride.


This attraction is A LOT of fun! Unlike similar scavenger hunts at some of the other Disney parks, this one is clearly very thoughtfully planned, and took some time and expense to create. Instead of just nailing up a few painted boards of Easter Eggs, this attraction goes whole hog and is Imagineered with some impressive physical special effects. Objects that are normally considered "just part of the decor" now become key parts of a new Disney experience. I'm certain that by design, the maps guide you to make several trips to the Pirate's Bazaar gift shop. Some ulterior motive, perhaps, like separating your money from your person while you're thoroughly enjoying yourself.

The only improvement I can think of would be replacing the reward Treasure Cards with something more tangible. I just think a card is... anti-climactic. Something that's cheap but in-theme and completely appropriate would be a plastic "gold doubloon". They're sold as party favors at party stores, and a large mega-corporation like Disney could easily have a bunch custom-manufactured for this specific attraction. Guests would enjoy the more fully immersive experience, with a little piece of treasure to call your own to bring home.


Disneyland, Anaheim California, c. early 2000's


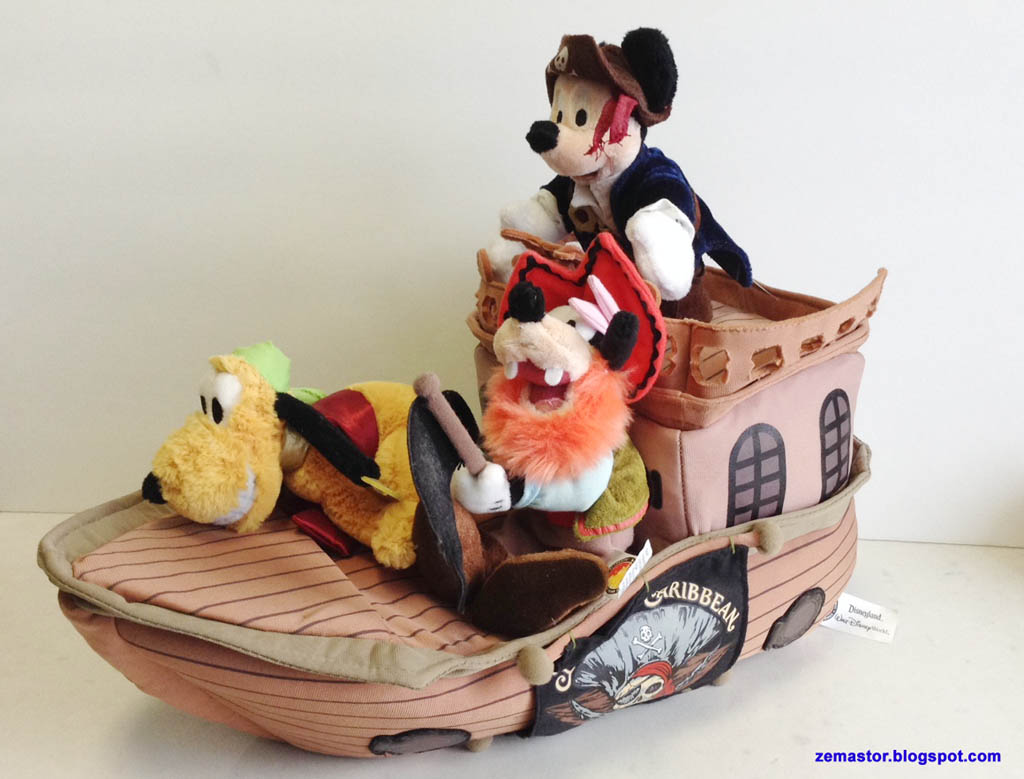
Mickey and Friends Pirate Ship Plush

I think I picked this up at the Disneyland Main Street USA Emporium in either 2001 or 2003. It was definitely after "Light Magic" debuted and tanked, and prior to the release of the hit movie "Pirates of the Caribbean: The Curse of the Black Pearl" because the shop was not full of Johnny Depp at the time.

Plushie beanbags are like stuffed animals. After Beanie Babies became big, Disney got in on the fad by selling plushies of Mickey Mouse, Minnie Mouse, Donald Duck and their main cast of characters. The Disney Parks wisely sold plushies of Mickey Mouse dressed as a pirate, as park-exclusive merchandise tied to the theme park ride.

As I was hunting for souvenirs, I was more interested in this one than most, because a) these plushies were smaller than the ones sold separately. They're only 6" tall. b) it had a whole plushie ship c) It had large cloth tags specifically saying "Pirates of the Caribbean", making this unique to the parks and not available at the local mall's Disney Store.


Even though it was $30, I went for it. I kind of knew that if I passed it up, it would not be available on my next trip to Disneyland. And sure enough, the plushie pirate ship was gone by my next trip to Disneyland a few years later.

The entire ship is soft, kid-friendly plush. There are no bits of plastic or sharp edges, so in theory, it's safe to give to babies, but c'mon... this thing cost $30.00. Better to wait until the kid gets older and begins to comprehend just how cool "Pirates of the Caribbean" (the ride) really is.

The plushies included are Mickey Mouse, Goofy and Pluto, all dressed as pirates. They're attached to the plushie ship with those thin, clear plastic clothing ties. Since I bought it as an adult, I kept the tags on and left Mickey and Friends tied to their ship.


Disneyland, Anaheim California, 1974


"Pirates of the Caribbean" Souvenir Book

This "Pirates of the Caribbean" souvenir book is probably one of my favorite pieces of Disney memorabilia. See, kids, there was a time when people didn't have cell phones, tablets or digital cameras, and such things as "The Internet" didn't exist. You didn't have a way to view videos, or access thousands of pictures of the attraction. So, when your family went to Disneyland in the 70's, your parents took vacation snapshots of the family standing outside some attraction. Photographing a dark ride like Pirates was near-impossible, unless Dad was a professional photographer with some high-end equipment. And, Disneyland highly discouraged flash photography, so all you had were memories of the best-ride-in-the-world... until this book (originally published in 1968) made it back to gift shops in Disneyland in 1974.

1974 version of Pirates souvenir book
It was a dream come true! It's a 52 page book that tells the story of the Pirates ride. Chock-full of Marc Davis (uncredited) illustrations and professionally-taken photos of the ride, as well as behind-the-scenes photos of Disney Imagineers at work, this book was itself a treasure and sold for one dollar.

The first part was titled, "The Golden Age of Piracy", a factual and educational history of real pirates. This section contains a large number of humorous Marc Davis conceptual artwork depicting many of scenes and characters that did (and did not) make it into the final ride. His drawings of the real pirates exist to this day painted on the walls of the Pirates attraction entryway at Disneyland.


The middle section, "The Pirates Come to Life... IMAGINEERING" is about how Walt Disney and his team of Imagineers created the ride, using "space-age Audio-Animatronics". This section contains a lot of photos of how the props and life-sized, moving figures were made, using the most advanced, state-of-the-art technology available in the 1960's. I'm very fond of the pictures of the miniature diorama mock-ups of the ride in approximately MEGO scale.


The final section is a set of photos from the ride, with the scenes in roughly sequential order, interspersed with more Marc Davis artwork. They've become important now, showing the ride in it's 1960's/1970's politically-incorrect glory, as several of the scenes had been toned-down and replaced in the past 20 years.


Note: A more in-depth and up-to-date history of the ride is covered in the excellent book, "Pirates of the Caribbean: From the Magic Kingdom to the Movies" by Jason Surrell. Highly recommended.


Disneyland, Anaheim California, circa 1970-78


Treasure Coins of the Caribbean

Here's one of my vintage Disneyland Pirates souvenirs. I recall that these used to be for sale at the cash register counter. I don't remember the exact date- sometime between 1970-1978, based on the price ($5.00), lack of a barcode, and my age at the time.

Treasure Coins of the Caribbean from Disneyland
It's a set of six reproduction coins from the Age of Piracy. These are made of metal, and most of them are rather hefty, and about the size of a US silver dollar. Some of them are cut, reflecting the 17th-18th century practice of chopping coins in half or in quarters to make smaller change. On the back is some educational information about the "Treasure Coins of the Caribbean". And, in the bottom right corner, there is a faux silver cob coin, also known as "Pieces of Eight".

What kid could resist this? To be able to ride "Pirates of the Caribbean" at Disneyland and then go home with your own piece of "real" pirate treasure? It's not gold, sure, but silver is almost as good, right? A child could pull out the silver cob, hold it in hand, and whisper about it being "blood money" and how pirates stole it, fought each other for it and died for it.

These are (of course) no longer sold in gift shops at Disneyland, but it is possible to buy similar (actually better and more detailed) reproduction Pieces of Eight coins online.


GAF View-Master "New Orleans Square and the Haunted Mansion"


Ahhh, View-Master! Another blast from my past. I believe that I got this around 1972. Unfortunately, I did not get View-Master sets of the other Disneyland themed-lands. I probably should have begged my parents to buy the other ones, since Disneyland had gone through many changes in the last 40 years, and many of the photos show places and attractions that no longer exist.

For the uninitiated, View-Master is a toy 3D slide viewer. The slides were sold in packages of 3 round reels, each with 7 pictures, making 21 different pictures total. You'd stick a reel in the slot, look through the viewer, admire the high-quality color 3D photo and then push the lever on the right hand side to advance to the next slide. The View-Master packages also contained a booklet that had additional information about each of the slides.

Don't laugh... in the days before video recording became widespread, View-Master was an inexpensive way look at your favorite tourist attractions again and again in the comfort of your own home. It was a way to vicariously re-live that trip to Disneyland. With some imagination and a lot of wishing, it was the closest thing to being there.

View-Master and Disneyland New Orleans Square reel pack
The first two reels are mostly pictures of the "Pirates of the Caribbean" ride. The third reel is "The Haunted Mansion". I should mention that the Pirates photos on the View-Master reels are not identical to the photos in the 1974 souvenir book. They were taken at alternate angles, and include scenes present in the ride (The Blue Bayou) but missing from the book. They're in 3D, and are of better quality than my crude scans below may indicate.

View-Master slides scanned on a flatbed scanner
It's still enjoyable to pop in the reels and take a look, remembering how useful they were in the context of the times. But, in reality, whenever I really feel like re-living the ride experience, I go on over to YouTube.


Tuesday, October 18, 2016

Pirate Hats and accessories (for action figures) DIY Tutorial

It's Halloween time and everybody, including your action figures, wants to be a pirate! Arrr matey! If only pirate stuff were easily and cheaply available for any figure!

My collection of toy skeletons spend a lot of time wishing they were in Disneyland (like I do), so while I was making my Pirate Bar dollhouse, I also needed to come up with some pirate hats. An online discussion mentioned Assassin's Creed figures and accessories, and of course, there's the authorized "Pirates of the Caribbean" action figures based on the movies, but I am a cheapskate at heart, unwilling to buy figures just for the sake of stripping off their accessories, plus I have customizing skills aplenty. I wanted to try making my own pirate hats.

I tried cloth and leather, with disappointing results, so I tried Sculpey polymer clay. It was shockingly quick and easy and I really liked the results, so Sculpey was definitely a winner!
Proof of concept- making pirate hats

PIRATE HAT SCULPEY TUTORIAL


Step 1: Buy a package of Sculpey. You can also buy a multi-color pack at Michaels and download their 40% off coupon.  Put a sheet of wax paper on your work area, and cut off a slice or two of Sculpey.
Step 1: Buy Sculpey. Slice.
Step 2: Roll the Sculpey slices into a ball, making sure that all of the bits and pieces mold together. Flatten the ball into a pancake. Use a rolling pin or a nearby can of WD-40 and roll the pancake to 1mm in thickness. 1/16" is acceptable for larger action figure heads.
Step 2: Roll into a ball and flatten it
Step 3: Making a hat form speeds up production considerably. This is a wooden bead that happens to be the right size, mounted on a bamboo stick.
Step 3: Make a hat form
Step 4: Put the flat, round Sculpey on the hat form. Press down slightly, and the hat crown will gradually form.
Step 4: Put Sculpey on form
Step 5: Refine the hat shape with additional pinching. Straighten out and trim the brim.
Step 5: Refine the hat shape
Step 6: Fold up 3 sides of the brim. It's surprisingly easy to make that perfect colonial-era tricorn hat!
Step 6: Fold up the brim
Step 7: Gently remove the hat from the hat form, and put it on a piece of foil. Place in the oven at low heat (about 200 degrees) for about 5 minutes. Babysit it so it doesn't burn.
Step 7: Bake!
Step 8: When it's fresh out of the oven, the hat will be hot! Put it on your action figure, and it will mold itself to the figure's head shape as it cools. Try not to burn your fingers doing this step.  If the hat cracks, just make another one. Once the hat cools, you might want to paint on some matte acrylic clearcoat to provide a barrier, in case you're worried about a chemical reaction between the Sculpey and your action figure.
Step 8: Mold to exact figure's head
Step 9: Make a lot more! It takes about 5 or 10 minutes to make each hat. This method is really inexpensive, and you can custom make each hat for a specific head, without waiting for toy companies to manufacture them.
Disneyland, here we come! Arrrr!

PIRATE CUTLASS TUTORIAL


For a minimal investment, or just digging around in the tools and parts drawer, it's quick and easy to manufacture your own Pirate Cutlasses.

Step 1: Buy a package of plastic sword cocktail picks. You can get them at any party supply store, or even the dollar store. Then locate a cheap or free source of ABS plastic. I used an old Macbook tray. The plastic should be thin enough to trim with heavy duty kitchen shears.
Step 1: Buy sword shaped cocktail picks and find some ABS
Step 2: Use a pair of wire cutters to cut off the plastic sword blade. Then cut your piece of ABS to the shape of a cutlass blade. Use sandpaper to finish the edges. If you need a thicker blade, cut out 2 identical cutlass pieces from the sheet, and glue them together. Carve a peg at the bottom of the cutlass blade.
Step 2: cut off sword blade and shape replacement cutlass blade
Step 3: Use a power drill and drill a small hole in the party pick's sword hilt.
Step 3: Drill hole in hilt
Step 4: Use 5 minute epoxy to glue the new blade into the sword hilt. The peg-in-hole will give you a much stronger joint than simply gluing the 2 pieces together without any reinforcement.
Step 4: Glue new blade into hilt
Step 5: Paint the cutlass with your favorite primer. This step is optional.
Step 5: Paint with primer
Step 6: Paint the cutlass with its final color and allow it to dry. The use a matte clearcoat.
Step 6: Paint with final colors and clearcoat


RELATED PAGES: 


"Captain Bar" DIY Dollhouse becomes Pirate Bar
Miniature DIY Pirate Gachapon Machine
Polymer clay miniature coins for dioramas
Greek Mythology Vitruvian H.A.C.K.S. action figures
The Search for Dokuroman
October Toys Skeleton Warriors
A Collection of Toy Skeletons

Monday, October 17, 2016

"Captain Bar" DIY Dollhouse becomes Pirate Bar


It's been about a year since my last dollhouse project (Jazz and Blues Club) so I've been itching to do another building. Some of the more recent DIY offerings were "Fried Chicken and Beer", "Free Time Coffee" and "Sakura Sushi Bar", all available on Ali Express and Ebay. What eventually won out was "Captain Bar" (missing the possessive "'s"),  a tiny shack that could be modified into a "Pirates of the Caribbean"- inspired skeleton pirate bar!

I ordered it from ebay for about $20, with shipping from China included. It took a bit less than 2 weeks to arrive. The box got banged-up a little, but the contents were fine.

"Captain Bar" DIY dollhouse box
One thing to note: There is no "brand name" anywhere on the box, or on the instruction manual. The box side panel mentions "Guangzhou Hongda Craft Co.", and it's likely that it's from the same company that makes "DIY Cuteroom" and "Know Me" dollhouse shops. The kit is not of Pakitoy quality, but is a definite step up from their original 2009-era European Miniatures Shop series. I would say that it's worth the $20.

Here's a look at the parts. The kit includes 3 LED lights, all connected to a small circuit board with 3 button batteries. The parts quality is generally OK, although the side walls were slightly warped. A clothes iron and a brick solved that problem. It comes with a bottle of white glue, but since the quality of the glue is unknown, I stayed with my tried-and-true favorite glues: Elmer's Wood Glue, Aileen's Tacky Glue, Loctite's 5 minute 2-part Epoxy, and E-6000. Different glues for different purposes.

"Captain Bar" DIY dollhouse box contents
I knew from the beginning that the building height of 6" was too short, so I planned on increasing the height of the building by 3/4", which would make it look less claustrophobic and also bring it to 1:18 scale.

It took a while for me to get started. I got sidetracked by other projects, writing other blog pages, absorbing new toy skeletons and new gachapon for my collection and playing pirate video games like Tropico 2 and Sid Meier's Pirates.
  
Here are some photos of the mid-point completion of the Captain Bar. I placed in some 1:18-ish skeletons to check for fit, and they ended up looking like they were having a lot of fun checking out their new place of business prior to opening.

Rement Pose and Boss Fight Vitruvian Hacks skeletons
Dokuroman is shocked at the size of the gachapon treasure chest.
Other mods:
  • Replaced the printed paper "wood" wallpaper with actual wood paneling.
  • Replaced the printed paper "stone" floors with stones cut from an egg carton, painted, varnished and grouted with spackling paste. This is a common dollhouse-making technique for exterior bricks and paving stones.
  • Replaced the beer mugs with pieces cut from a Bic pen, instead of using the included aquarium tubing.
  • Replaced the solid block treasure chest with a handmade wooden one that opens and closes and contains a pile of pieces o' eight.
  • Increased the height of the furniture by cutting new panels in plywood. Also re-did the barstools with a larger seat and made them higher to match the new furniture height.
  • Added 2 additional bottle racks and made more bottles.
  • Used a wood chisel to taper the wood barrels. The original instructions were to simply glue a stack of concentric discs together and I thought that looked awful.
  • Made a bunch of pirate cutlasses by cutting up a Macbook plastic tray, shaping them into a cutlass shape and gluing them to the hilts of cocktail party swords.
  • Pirate skull wall decor was made from a skull from a Halloween bracelet cut in half. Crossbones carved from basswood and painted.
Here are some photos of the Captain Bar (being renamed to "The Rusty Cutlass") at a later stage of completion. The photo taken at night looks pretty dramatic with a transparent Jade green October Toys skeleton.

"The Rusty Cutlass" Pirate bar at night
The instructions were vague about what to do with the wiring, circuit board and battery, so I built a "stone" chimney on the outside to hide all that stuff.


For some reason, a lot of the newer, inexpensive made-in-China DIY dollhouses do not have fronts, and a storefront is at least 50% of the charm of a dollhouse-sized shop. So, I cut up an MDF clipboard to provide a storefront. The same clipboard also provided the sides for the storefront piece as well as the 3/4" building height booster.


The larger pirate skull was a ceramic bead from the hobby store, and the smaller skull was cut from a Halloween skull bracelet.

The original store signage was simply a piece of printed paper to be pasted on wood. That wouldn't do, so I took a lot of influence from Disneyland's 3-dimensional attraction signs like "Peter Pan's Flight" and "Splash Mountain". I briefly considered making the scroll of heavy paper, or wood putty, but in the end, I used Sculpey polymer clay for its predictability, quick setting time and ease of use.


Outside, I placed my 2 pirate gachapon machines. I finally found a proper context in which to display them!


On the inside, I made use of a samurai sword gachapon. Since it did not have a removable blade, I made a small plaque and mounted it, to make it look like the pirates picked it up as a souvenir on a sailing trip to Japan. The posters were scanned from one of my books, "Pirates of the Caribbean: From the Magic Kingdom to the Movies".


RELATED PAGES: 

Pirate Hats (for action figures) DIY Tutorial
Miniature DIY Pirate Gachapon Machine
Polymer clay miniature coins for dioramas
Greek Mythology Vitruvian H.A.C.K.S. action figures
The Search for Dokuroman
October Toys Skeleton Warriors
More Gacha-Love, shipped from Japan!
A Collection of Toy Skeletons