INSPIRATION
I am working on a larger "Pirates of the Caribbean" inspired project, and for a related small side-project, my mind went back to the classic LucasFilm Games "The Secret of Monkey Island" videogame. The hero, Guybrush Threepwood, finds a grog vending machine while trying to buy a ship. |
| "The Secret of Monkey Island". Money well spent in 1993. |
LEARNING FROM A YOUTUBE TUTORIAL
Thanks to YouTube, one can find several DIY videos on how to make a gachapon machine. I got most of my inspiration from the user "Polymomo Tea" and his polymer clay tutorial here:DIY Miniature Clay Toy Capsule/Gashapon Machine Tutorial
Once I saw his video, I understood the necessary mechanisms to make it work. I prefer working with wood, since I find it sturdier. Wood also looks more rustic and period-appropriate for the Pirate Age.
BUILDING THE MACHINE
A trip to the hobby shop solved my problem about what to use for the glass display. They have these small acrylic display cases that are about 1" x 1" x 3". That was the only item I needed to purchase specially for the pirate gachapon machine project. The rest of the supplies like wood, cardstock, Halloween bracelets and beads were already sitting around the house. |
| Work in progress- Parts |
1) Sawed-off acrylic plastic case with original lid
2) Custom plywood box to hold the gachapon mechanism. Note the slanted floor (to coax the prizes to roll downwards to the dispenser)
3) Replacement wooden lid for acrylic case
4) Wooden base made from popsicle sticks
5) Tumbler to rotate, pick up a prize and dispense it. Tumbler was made from cardstock, wrapped around a pen, glued and sealed with several coats of acrylic sealer. Two wooden pegs were attached to the ends.
6) Wooden triangle wedge to guide the downward motion of the prizes
7) Wooden knob to turn
Here's a view of the box mechanism:
Here's a view of the dry-fit of the parts:
I created a gachapon header card using Photoshop, combining various pieces of clipart mooched from the Internet. I printed them in several sizes until I found the size that worked.
Here's the header card. I was unable to cut/paste Japanese characters into Photoshop, so I ended up pasting them into Notepad, increasing the font size to 96 points and doing a print screen. Then I pasted the Japanese characters as a graphic into Photoshop. The top says "Pirate Gachapon". The text in the middle says "You can win a gold pirate doubloon!" and the bottom has the various warnings about not for children under 3 years old. At least that's what Google Translate tells me. I hope it's right.
 |
| Pirate Gachapon Header Card graphic |
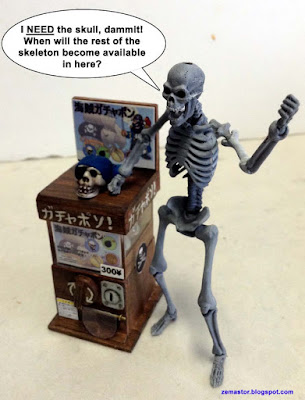
There are miniature gachapon machines on ebay, for themes such as Disney, Angry Birds, Dragonball-Z, and Pokemon. I could have bought one and modified it, but I like the challenge of scratch-building. The mini-machines have a large matching theme figurine on the top, so I copied that idea and added a skull (from a Halloween bracelet) for the top of my DIY machine. I added an eyepatch and bandanna to make it look more pirate-y.
The dimensions of the machine is 1.25" x 1.25" x 2.25". It is around 1:12 scale... I could have made it smaller, but I really wanted it to dispense the little skulls, so I had to make it the appropriate size. The mechanism is not 100% reliable- since the prizes are not exactly round, they sometimes jam in the hopper.
Here's the completed Miniature DIY Pirate Gachapon Machine! It took about 4 days, as there was a learning curve, and I also needed to do the Photoshop graphics and write a blog page too.
FUN WITH FIGURES AND THE GACHAPON MACHINE
Here's what the DIY Pirate Gachapon machine looks like with various action figures. Kaiyodo's Dokuroman skeleton bangs on the machine, hoping to get a skull. He hopes that someday, the machine will dispense whole skeletons.In the next picture, I placed an October Toys skeleton, and a Figma Archetype "She" figure for scale. The gachapon machine is relatively in-scale for figures of this size (about 5").
 |
| Figma Archetype "She" and October Toys skeleton with gachapon machine |
SECOND MACHINE- A QUICK BUILD
Most of the time, real gachapon machines are sighted in multiples. Since I already had all the tools out and the hard-earned know-how about building them, I decided to build a second gachapon machine. This one is intentionally non-functional, saving me the time and trouble of exacting measurements. I also cut a lot of the build time by switching to basswood instead of using plywood. Basswood is so soft that it can be cut with a utility knife, instead of a saber saw or X-acto razor saw and miter box.Instead of needing to carve triangular wedges out of wood, I used strips of painted cardboard for the ramps. The non-functional tumbler is simply a split wooden dowel, with a partial hole ground into it using a Dremel tool. The header cards and machine signs were already made in Photoshop, so all I needed to do was print another set.
 |
| non-functional gachapon machine |
RELATED PAGES:
Pirate Hats (for action figures) DIY Tutorial
"Captain Bar" DIY Dollhouse becomes Pirate Bar
The Search for Dokuroman
Toy Shopping in Tokyo's Akihabara and Hong Kong's Mong Kok district
A Collection of Toy Skeletons
More Gacha-Love, shipped from Japan!
Tokyo's Akihabara Again and Gacha-Love, 2017


This comment has been removed by a blog administrator.
ReplyDelete