Showing posts with label doubloons. Show all posts

Tuesday, May 2, 2017

Japanese Billy dollhouse- Naniwa's Skewer (Kushi katsu) Shop

This is my first official Billy Dollhouse. The Billy Dollhouse Company in Japan makes ready-to-assemble dollhouses. The small kits sell for 3000 yen ($27.00 USD), and the larger kits retail for 5300 yen ($48.00 USD). They have a website and they sell online, but they do not sell directly to countries outside of Japan. Customers in the US can buy them from Amazon.Com, for about $10 above retail, which isn't too large a markup.

They're are very similar to the made-in-China DIY kits that I'd bought before. But in Japan, everything is more expensive, but generally, you get higher quality for the higher price. This kit cost me 5,300 yen ($48.00), which is about twice the cost of similar Chinese kits. It is called "ナニワの串カツ屋さん", which Google Translate says is "Naniwa's skewer/kushi katsu/kushi age shop". I had seen samples of the finished kits at Volks Akihabara, so I knew they are slightly smaller than 1:18, perhaps more like 1:20 or 1:24 scale.

Parts inventory after opening the kit
One thing that I wasn't very enthusiastic about was Billy's use of foamboard and cardboard sheets to make a few parts. You're supposed to cut out the parts yourself, using the full-sized templates in the instructions. Personally, I just don't like foam board because of painting issues and gluing issues. I refused to build furniture with cardboard, so I did part substitutions for this build.

The instructions are completely in Japanese, with zero English. Since I'd done these kinds of dollhouses before, I made educated guesses about how to assemble it by looking at the diagrams, as well as watching YouTube videos by the user HMS2.

Since this dollhouse shop is sub-1:18 scale, my plan was to modify it to bring it into proper 1:18 by using 1/4" x 3/4" x 8" basswood strips to boost the height of the walls. The back panel of the shop needed to be replaced, so I used a thin MDF backer board from a Daiso picture frame.


Day 7: 

Here's an in-progress shot of the Billy DIY dollhouse project. This photo shows how to increase the height of a wooden dollhouse in order to bring it in-scale with larger figures, in this case going from 1:20/1:24 scale to 1:18.

Day 7 of dollhouse construction
Clockwise from the top:
  1. Main building: The 3/4" basswood strips can be seen on the outside. On the inside, the booster strips had already been covered-up with a wide baseboard, which is a textured paper strip. The outside will eventually be covered up with siding.
  2. Doors: Since the building height is being increased, the doors also need to be taller. There's a 1/2" basswood strip on the bottom of the door. Once the door is painted, the booster will not be visible.
  3. "L" shaped counter: The instructions called for cutting the countertop from foamboard and the cabinet from cardboard. I completely replaced all of it with a hand-cut basswood countertop and very thin leftover MDF from a picture frame backing board.
  4. Small outdoor counter: Also has a 1/2" basswood strip to boost the height. The outside is covered with a strip of bamboo mat, replacing the flattened corrugated cardboard strip mentioned in the instructions.
  5. The original stools actually fit Rement Pose skeletons pretty well. I decided to designate them as "kid's stools". Then I made 4 slightly larger ones from scratch (same style) for the "grownups". I found some excellent "textured cloth" origami paper at Daiso, so I used that to replace the original paper chair covering.
  6. The yatai (street food stall) cabinet also needed a height boost to make it proportional to the new height of the building and furniture. I added a 1/2" basswood strip, and replaced the intended cardboard counter with thin MDF. All of the changes will be invisible once the cabinet is painted.
The Billy dollhouse kit includes 3 small bottles of paint. After trying them out, I'll say that the paint is definitely unlike the craft acrylic paints that we have in the US. The Billy paints are water based, but they are semi-transparent, semi-gloss, really quick-drying and have a lot more "stick" to them. They adhere to the surfaces very well- almost too well, because it was difficult to wash the dried paint off of my hands! I had to use a pot scrubbing sponge.


Day 15: 

Well, the Billy dollhouse is still a work-in-progress. I've completed the building, interior furniture and the yatai (street food) cart, as well as the small outdoor counter. Everything's painted and nicely covering up all of the height booster strips.

Day 15 of dollhouse construction
Yup, bringing the scale to 1:18 was a good idea. Here's what it looks like with figures: Boss Fight Studio skeleton, Pose skeleton, and manning the yatai- a "125mm full-action Kamen Rider SAGA Kuuga" gachapon figure, fresh from Japan. The samurai armor suit is another gachapon capsule toy.

But there's NO FOOD! I'll be working on that over the next few days. I know, a restaurant looks kind of pitiful with hungry customers and no food.


Day 21: 

We have food now! and BEER! The food is made in the most unexpected way: cutting tiny pieces out of foam board and putting a thin wire through them. Then painting them with the included high-tack orange paint. Then coating them with glue and rolling them around in sand. And a final coat of orange paint. They really do look good enough to eat.

Day 21 of dollhouse construction
I'm approaching the completion of the dollhouse kit. Right now, the awning is only taped-on because I'm waiting for some LED lights from China. Eventually I'll have light-up lanterns under the awning.

Additional part substitutions:
  1. The flags and curtains were originally printed paper. I scanned the paper sheets, printed them on iron-on paper and ironed them on cloth. Cloth has far superior function and aesthetic.
  2. The beer mugs were supposed to be cut from flexible aquarium tubing. But, the resulting mugs would be seriously out of scale, and the material is difficult to glue. I replaced them with mugs cut from a BIC pen and some wire for the handles. 
  3. The instructions called for food trays to be flat cardboard rectangles covered with foil, with the food placed on top. For practical reasons, that design wouldn't work in real life because the excess oil would just flow onto the countertops. I replaced them with proper food trays with fold-up sides, cut from silver-colored cardstock.
  4. I used heavy textured tan cardstock to make the chopstick cups 
  5. Things were getting crowded on the base, so I increased the size of the base by 3/4" by gluing on basswood strips. This would be covered up by the paving stones, eventually.
The sidewalk is next on my list to do.


Day 29: COMPLETION! 

I'm done! This project took 4 weeks. I could have done this faster if I stuck to the instructions and made it exactly as-is, but it was always my intention to increase the size to 1:18 scale, and to do a deluxe version of the kit.


This pic is taken from the side, and shows the following improvements:
  1. Paving stones made from egg cartons, trimmed, painted, sealed with clearcoat and grouted with spackling paste.
  2. Added a samurai armor gachapon. I found this in a gacha machine at Yodobashi Akiba, on the same night that I bought this dollhouse kit at Volks Hobby Paradise Akihabara. I initially wasn't sure what to do with it, but when I did a dry fit of it next to the kushi katsu shop, something clicked and I liked the look.
  3. Created a bamboo pot for the plant. The instructions were vague about what to do with the plant. Was I supposed to drill a hole in the base and just stick it in? I had leftover bamboo from a bamboo mat used in an earlier project, so I made a pot by wrapping heavy paper around a marker to make a cylinder, and then wrapping a strip of bamboo mat around it.
  4. Made Japanese paper lanterns instead of using styrofoam balls.
Day 29 completion of dollhouse construction


WHEN THE LIGHTS GO DOWN IN THE CITY

It took 25 days for my LED lights to arrive from China. A dozen of them cost only 11 cents (US). The time spent waiting wasn't wasted. I was working on some lanterns, because, dammit, I wanted the lanterns to light up. The original instructions and materials intended for them to be made from styrofoam balls covered with paper, but if I made them that way, I would not be able to insert LED bulbs inside.

So, I ended up making them old-school style: by winding cloth-covered floral wire around a marker and shaping to coils by hand to taper at the ends. Then I covered them in Japanese washi paper. I added a small wire handle at the top, so I could hang them from hooks on the roof.

I wired the LEDs in parallel. They were 3v each, at 20mAh. Since there's 5 of them wired in parallel, they could all run on a single CR-2032 battery, and I had several battery boxes in my stash. It technically works, but a load of 5 LEDS is a bit much for a single coin cell, so I'm expecting the lights to run down the battery pretty quickly.

Kushi Katsu shop illuminated at night with lanterns
Lighted dollhouses look entirely different at night. The photo here is actually a pretty good replica of what it's really like to stop at a kushi katsu shop at night. The Japan I saw (Tokyo) is all skyscrapers, multi-floor mega shopping complexes, bright lights, traffic jams and trains. These kinds of traditional shops still exist in places like Shibamata and Osaka. I love Japan! Maybe on my next trip, I'll venture beyond Tokyo.


FINAL EVALUATION OF BILLY DOLLHOUSE KIT

Now that I've completed my first Japanese Billy dollhouse kit, I can make an objective evaluation of them.

They're rather expensive for what you get. This kit is one of their largest and most expensive ones at 5300 yen. Although the MDF was measured and cut very precisely and finished very well, the Billy dollhouse company seems to have an aversion to making smaller parts out of wood. Many parts, such as countertops and cabinets were supposed to be cut from foam board or cardboard. The roof pieces were supposed to simply be glued at an angle, when they should have wooden triangle-shaped supports. And items that should be cloth are printed paper. I did an awful lot of part substitutions.

The kit did not come with any light bulbs and was never intended to light up. I fixed that (of course) and kicked in about $10 for additional materials (wood, MDF, various types of paper, cloth, Plastruct rails, floral wire, lights).

Manufacturer's photo (left) vs actual dollhouse. A good match
Since I was on vacation in a foreign country and very determined to spend money, that justified the purchase. It's a souvenir of Japan, with some cultural and historical significance, as well as a hobby kit. This was a fun and interesting project, and now it looks like it came from a $48.00 kit. But in its original form... maybe not. I am not certain if I would purchase another Billy dollhouse kit. The materials are rather basic, and I believe I can construct a similar dollhouse from scratch for a fraction of the cost.

Sometimes I really think that toy skeletons have a better life than I do

RELATED PAGES:

Tokyo's Akihabara Again and Gacha-Love, 2017
"Captain Bar" DIY Dollhouse becomes Pirate Bar


Tuesday, February 14, 2017

My Disneyland/Disney World "Pirates of the Caribbean" memorabilia

This is a selection of some of my "Pirates of the Caribbean" memorabilia, some of them very recent (Feb 2017) and some of them vintage pieces from my childhood in the 1970's.

Disney World, Orlando Florida, Feb. 2017


"Pirates of the Caribbean" Attraction Figurines

It's been a while since I'd bought any Pirates souvenirs from the Disney Parks giftshops. Nothing had caught my eye in the past few years. Too generic, or too heavily-based on Captain Jack Sparrow from the movies. On my latest trip, this set got my attention. These figures are characters seen on the actual ride! None of this movie nonsense, or Mickey Mouse wishing he was a pirate. These are the real deal! Yes!

"Pirates" figurines in box
Clockwise from upper left:
1) "The Pillager" skeleton pirate from the "Dead Man's Cove" scene early in the ride. Normally seen pinned against a rock with a cutlass stuck in his chest. The figurine is slightly different from the ride figure because it's wearing pants and boots- probably a manufacturing necessity because a barelegged and barefoot skeleton would be too delicate for intended customers, including kids.
2) Adorable parrot pirate figurine- the spittin' image of the one that's perched at the front entrance of the attraction at Disney World.
3) "The Redhead" from "The Auction" scene. She really doesn't seem to mind being auctioned off to the highest pirate bidder. The figurine is true to the original Marc Davis concept sketches.
4) "The Pooped Pirate" from "The Chase" scene. He's shown in his current incarnation with a key and a treasure map, looking for Captain Jack Sparrow (and not a girl hiding in a barrel).
5) "The Auctioneer" from "The Auction" scene. He's also very true to the Marc Davis concept art. In particular, his caricatured face is wonderfully expressive.
6) The "Treasure Keeper" from the "Sacking the Town" scene. He's the menacing pirate in charge while his underlings dunk the mayor in the well. The figure's footwear differs from the ride figure. The toy version is wearing heavy boots while the ride figure wears striped socks and pilgrim shoes. This is also probably a manufacturing necessity to make a sturdier figure.

They're 4" tall and have zero points of articulation, but they have the true flavor of the ride. The set of 6 of them is only $16.99- meaning less than $3.00 per figurine. In this day and age, it's a bargain. Their size makes them reasonably compatible with Boss Fight Studio, Kaiyodo Dokuroman and Rement Pose skeletons.

Size comparison w/ Dokuroman, Boss Fight V-Hacks and Pose skeleton
I'd certainly like to see Disney Parks continue this line of exclusive Pirates merchandise based on the ride. One can only salivate over the idea of a complete line of 1:18 Pirates figures! Just think- with a large plywood sheet, lots of paint, paper mache, basswood, wooden dowels, LED lights... what it would be like to have your own 1:18 "Pirates of the Caribbean" in your home!


"A Pirate's Adventure" Treasure Maps

I guess these qualify as souvenirs. They're maps from a fairly recent new attraction called "A Pirate's Adventure - Treasures of the Seven Seas", only at Disney World. They're 11" x 17", on high quality paper, well-illustrated in full color and have some nice touches, like "aged" and "tattered" edges.


It's basically a self-paced treasure hunt. You enter a little shack at the edge of Adventureland, touch your admission ticket card to a well-disguised touchscreen and pick up a map. The screen gives you instructions on where to start your hunt. Each map has different symbols, and you're supposed to hunt for the real-life matching symbol on various props hidden in plain view in various locations in Adventureland.

When you find the match, you touch your card against the skull, cannon, furniture, etc. and it triggers some sort of physical animatronic action, such as a cannon firing, or a ship-in-a-bottle battle, and some dialogue and the next clue. When you complete the map, you can get it stamped, and receive a "collectable" (ha ha) Treasure Card. You may continue your quest with another map. After completing several maps, you can get a Fast Pass for the "Pirates of the Caribbean" ride.


This attraction is A LOT of fun! Unlike similar scavenger hunts at some of the other Disney parks, this one is clearly very thoughtfully planned, and took some time and expense to create. Instead of just nailing up a few painted boards of Easter Eggs, this attraction goes whole hog and is Imagineered with some impressive physical special effects. Objects that are normally considered "just part of the decor" now become key parts of a new Disney experience. I'm certain that by design, the maps guide you to make several trips to the Pirate's Bazaar gift shop. Some ulterior motive, perhaps, like separating your money from your person while you're thoroughly enjoying yourself.

The only improvement I can think of would be replacing the reward Treasure Cards with something more tangible. I just think a card is... anti-climactic. Something that's cheap but in-theme and completely appropriate would be a plastic "gold doubloon". They're sold as party favors at party stores, and a large mega-corporation like Disney could easily have a bunch custom-manufactured for this specific attraction. Guests would enjoy the more fully immersive experience, with a little piece of treasure to call your own to bring home.


Disneyland, Anaheim California, c. early 2000's


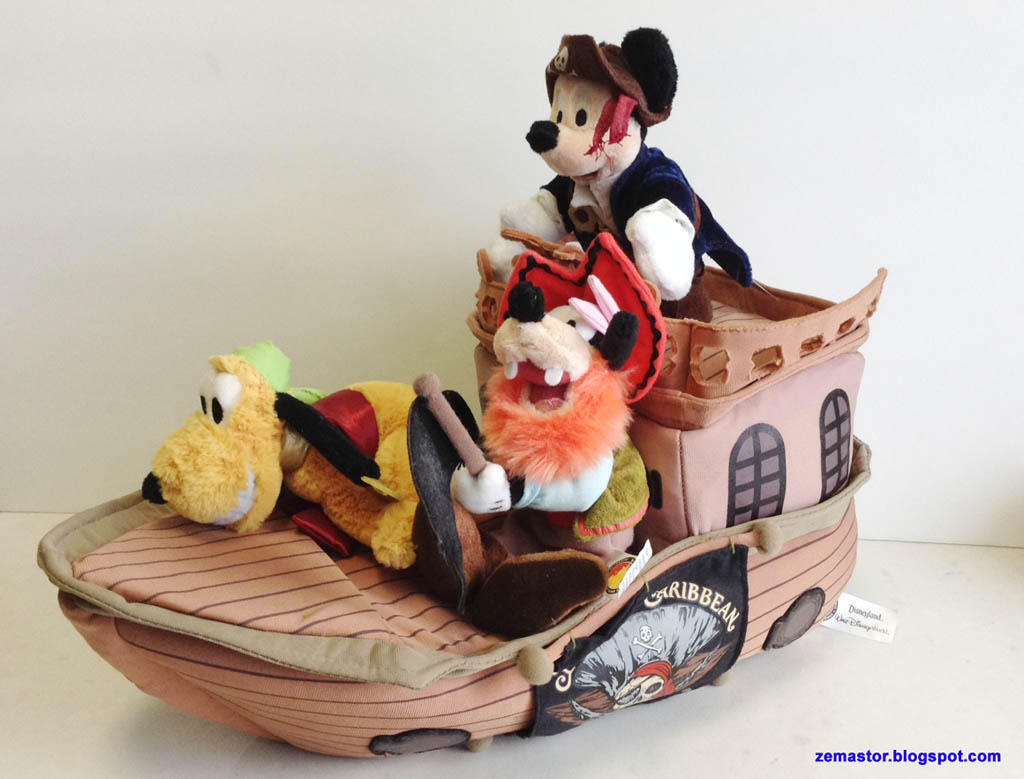
Mickey and Friends Pirate Ship Plush

I think I picked this up at the Disneyland Main Street USA Emporium in either 2001 or 2003. It was definitely after "Light Magic" debuted and tanked, and prior to the release of the hit movie "Pirates of the Caribbean: The Curse of the Black Pearl" because the shop was not full of Johnny Depp at the time.

Plushie beanbags are like stuffed animals. After Beanie Babies became big, Disney got in on the fad by selling plushies of Mickey Mouse, Minnie Mouse, Donald Duck and their main cast of characters. The Disney Parks wisely sold plushies of Mickey Mouse dressed as a pirate, as park-exclusive merchandise tied to the theme park ride.

As I was hunting for souvenirs, I was more interested in this one than most, because a) these plushies were smaller than the ones sold separately. They're only 6" tall. b) it had a whole plushie ship c) It had large cloth tags specifically saying "Pirates of the Caribbean", making this unique to the parks and not available at the local mall's Disney Store.


Even though it was $30, I went for it. I kind of knew that if I passed it up, it would not be available on my next trip to Disneyland. And sure enough, the plushie pirate ship was gone by my next trip to Disneyland a few years later.

The entire ship is soft, kid-friendly plush. There are no bits of plastic or sharp edges, so in theory, it's safe to give to babies, but c'mon... this thing cost $30.00. Better to wait until the kid gets older and begins to comprehend just how cool "Pirates of the Caribbean" (the ride) really is.

The plushies included are Mickey Mouse, Goofy and Pluto, all dressed as pirates. They're attached to the plushie ship with those thin, clear plastic clothing ties. Since I bought it as an adult, I kept the tags on and left Mickey and Friends tied to their ship.


Disneyland, Anaheim California, 1974


"Pirates of the Caribbean" Souvenir Book

This "Pirates of the Caribbean" souvenir book is probably one of my favorite pieces of Disney memorabilia. See, kids, there was a time when people didn't have cell phones, tablets or digital cameras, and such things as "The Internet" didn't exist. You didn't have a way to view videos, or access thousands of pictures of the attraction. So, when your family went to Disneyland in the 70's, your parents took vacation snapshots of the family standing outside some attraction. Photographing a dark ride like Pirates was near-impossible, unless Dad was a professional photographer with some high-end equipment. And, Disneyland highly discouraged flash photography, so all you had were memories of the best-ride-in-the-world... until this book (originally published in 1968) made it back to gift shops in Disneyland in 1974.

1974 version of Pirates souvenir book
It was a dream come true! It's a 52 page book that tells the story of the Pirates ride. Chock-full of Marc Davis (uncredited) illustrations and professionally-taken photos of the ride, as well as behind-the-scenes photos of Disney Imagineers at work, this book was itself a treasure and sold for one dollar.

The first part was titled, "The Golden Age of Piracy", a factual and educational history of real pirates. This section contains a large number of humorous Marc Davis conceptual artwork depicting many of scenes and characters that did (and did not) make it into the final ride. His drawings of the real pirates exist to this day painted on the walls of the Pirates attraction entryway at Disneyland.


The middle section, "The Pirates Come to Life... IMAGINEERING" is about how Walt Disney and his team of Imagineers created the ride, using "space-age Audio-Animatronics". This section contains a lot of photos of how the props and life-sized, moving figures were made, using the most advanced, state-of-the-art technology available in the 1960's. I'm very fond of the pictures of the miniature diorama mock-ups of the ride in approximately MEGO scale.


The final section is a set of photos from the ride, with the scenes in roughly sequential order, interspersed with more Marc Davis artwork. They've become important now, showing the ride in it's 1960's/1970's politically-incorrect glory, as several of the scenes had been toned-down and replaced in the past 20 years.


Note: A more in-depth and up-to-date history of the ride is covered in the excellent book, "Pirates of the Caribbean: From the Magic Kingdom to the Movies" by Jason Surrell. Highly recommended.


Disneyland, Anaheim California, circa 1970-78


Treasure Coins of the Caribbean

Here's one of my vintage Disneyland Pirates souvenirs. I recall that these used to be for sale at the cash register counter. I don't remember the exact date- sometime between 1970-1978, based on the price ($5.00), lack of a barcode, and my age at the time.

Treasure Coins of the Caribbean from Disneyland
It's a set of six reproduction coins from the Age of Piracy. These are made of metal, and most of them are rather hefty, and about the size of a US silver dollar. Some of them are cut, reflecting the 17th-18th century practice of chopping coins in half or in quarters to make smaller change. On the back is some educational information about the "Treasure Coins of the Caribbean". And, in the bottom right corner, there is a faux silver cob coin, also known as "Pieces of Eight".

What kid could resist this? To be able to ride "Pirates of the Caribbean" at Disneyland and then go home with your own piece of "real" pirate treasure? It's not gold, sure, but silver is almost as good, right? A child could pull out the silver cob, hold it in hand, and whisper about it being "blood money" and how pirates stole it, fought each other for it and died for it.

These are (of course) no longer sold in gift shops at Disneyland, but it is possible to buy similar (actually better and more detailed) reproduction Pieces of Eight coins online.


GAF View-Master "New Orleans Square and the Haunted Mansion"


Ahhh, View-Master! Another blast from my past. I believe that I got this around 1972. Unfortunately, I did not get View-Master sets of the other Disneyland themed-lands. I probably should have begged my parents to buy the other ones, since Disneyland had gone through many changes in the last 40 years, and many of the photos show places and attractions that no longer exist.

For the uninitiated, View-Master is a toy 3D slide viewer. The slides were sold in packages of 3 round reels, each with 7 pictures, making 21 different pictures total. You'd stick a reel in the slot, look through the viewer, admire the high-quality color 3D photo and then push the lever on the right hand side to advance to the next slide. The View-Master packages also contained a booklet that had additional information about each of the slides.

Don't laugh... in the days before video recording became widespread, View-Master was an inexpensive way look at your favorite tourist attractions again and again in the comfort of your own home. It was a way to vicariously re-live that trip to Disneyland. With some imagination and a lot of wishing, it was the closest thing to being there.

View-Master and Disneyland New Orleans Square reel pack
The first two reels are mostly pictures of the "Pirates of the Caribbean" ride. The third reel is "The Haunted Mansion". I should mention that the Pirates photos on the View-Master reels are not identical to the photos in the 1974 souvenir book. They were taken at alternate angles, and include scenes present in the ride (The Blue Bayou) but missing from the book. They're in 3D, and are of better quality than my crude scans below may indicate.

View-Master slides scanned on a flatbed scanner
It's still enjoyable to pop in the reels and take a look, remembering how useful they were in the context of the times. But, in reality, whenever I really feel like re-living the ride experience, I go on over to YouTube.


Monday, October 17, 2016

"Captain Bar" DIY Dollhouse becomes Pirate Bar


It's been about a year since my last dollhouse project (Jazz and Blues Club) so I've been itching to do another building. Some of the more recent DIY offerings were "Fried Chicken and Beer", "Free Time Coffee" and "Sakura Sushi Bar", all available on Ali Express and Ebay. What eventually won out was "Captain Bar" (missing the possessive "'s"),  a tiny shack that could be modified into a "Pirates of the Caribbean"- inspired skeleton pirate bar!

I ordered it from ebay for about $20, with shipping from China included. It took a bit less than 2 weeks to arrive. The box got banged-up a little, but the contents were fine.

"Captain Bar" DIY dollhouse box
One thing to note: There is no "brand name" anywhere on the box, or on the instruction manual. The box side panel mentions "Guangzhou Hongda Craft Co.", and it's likely that it's from the same company that makes "DIY Cuteroom" and "Know Me" dollhouse shops. The kit is not of Pakitoy quality, but is a definite step up from their original 2009-era European Miniatures Shop series. I would say that it's worth the $20.

Here's a look at the parts. The kit includes 3 LED lights, all connected to a small circuit board with 3 button batteries. The parts quality is generally OK, although the side walls were slightly warped. A clothes iron and a brick solved that problem. It comes with a bottle of white glue, but since the quality of the glue is unknown, I stayed with my tried-and-true favorite glues: Elmer's Wood Glue, Aileen's Tacky Glue, Loctite's 5 minute 2-part Epoxy, and E-6000. Different glues for different purposes.

"Captain Bar" DIY dollhouse box contents
I knew from the beginning that the building height of 6" was too short, so I planned on increasing the height of the building by 3/4", which would make it look less claustrophobic and also bring it to 1:18 scale.

It took a while for me to get started. I got sidetracked by other projects, writing other blog pages, absorbing new toy skeletons and new gachapon for my collection and playing pirate video games like Tropico 2 and Sid Meier's Pirates.
  
Here are some photos of the mid-point completion of the Captain Bar. I placed in some 1:18-ish skeletons to check for fit, and they ended up looking like they were having a lot of fun checking out their new place of business prior to opening.

Rement Pose and Boss Fight Vitruvian Hacks skeletons
Dokuroman is shocked at the size of the gachapon treasure chest.
Other mods:
  • Replaced the printed paper "wood" wallpaper with actual wood paneling.
  • Replaced the printed paper "stone" floors with stones cut from an egg carton, painted, varnished and grouted with spackling paste. This is a common dollhouse-making technique for exterior bricks and paving stones.
  • Replaced the beer mugs with pieces cut from a Bic pen, instead of using the included aquarium tubing.
  • Replaced the solid block treasure chest with a handmade wooden one that opens and closes and contains a pile of pieces o' eight.
  • Increased the height of the furniture by cutting new panels in plywood. Also re-did the barstools with a larger seat and made them higher to match the new furniture height.
  • Added 2 additional bottle racks and made more bottles.
  • Used a wood chisel to taper the wood barrels. The original instructions were to simply glue a stack of concentric discs together and I thought that looked awful.
  • Made a bunch of pirate cutlasses by cutting up a Macbook plastic tray, shaping them into a cutlass shape and gluing them to the hilts of cocktail party swords.
  • Pirate skull wall decor was made from a skull from a Halloween bracelet cut in half. Crossbones carved from basswood and painted.
Here are some photos of the Captain Bar (being renamed to "The Rusty Cutlass") at a later stage of completion. The photo taken at night looks pretty dramatic with a transparent Jade green October Toys skeleton.

"The Rusty Cutlass" Pirate bar at night
The instructions were vague about what to do with the wiring, circuit board and battery, so I built a "stone" chimney on the outside to hide all that stuff.


For some reason, a lot of the newer, inexpensive made-in-China DIY dollhouses do not have fronts, and a storefront is at least 50% of the charm of a dollhouse-sized shop. So, I cut up an MDF clipboard to provide a storefront. The same clipboard also provided the sides for the storefront piece as well as the 3/4" building height booster.


The larger pirate skull was a ceramic bead from the hobby store, and the smaller skull was cut from a Halloween skull bracelet.

The original store signage was simply a piece of printed paper to be pasted on wood. That wouldn't do, so I took a lot of influence from Disneyland's 3-dimensional attraction signs like "Peter Pan's Flight" and "Splash Mountain". I briefly considered making the scroll of heavy paper, or wood putty, but in the end, I used Sculpey polymer clay for its predictability, quick setting time and ease of use.


Outside, I placed my 2 pirate gachapon machines. I finally found a proper context in which to display them!


On the inside, I made use of a samurai sword gachapon. Since it did not have a removable blade, I made a small plaque and mounted it, to make it look like the pirates picked it up as a souvenir on a sailing trip to Japan. The posters were scanned from one of my books, "Pirates of the Caribbean: From the Magic Kingdom to the Movies".


RELATED PAGES: 

Pirate Hats (for action figures) DIY Tutorial
Miniature DIY Pirate Gachapon Machine
Polymer clay miniature coins for dioramas
Greek Mythology Vitruvian H.A.C.K.S. action figures
The Search for Dokuroman
October Toys Skeleton Warriors
More Gacha-Love, shipped from Japan!
A Collection of Toy Skeletons


Sunday, June 5, 2016

Miniature DIY Pirate Gachapon Machine


 Miniature... DIY... Pirate... Gachapon... Machine...

You'll probably never find that combination of words anywhere else but here! LOL.

INSPIRATION

I am working on a larger "Pirates of the Caribbean" inspired project, and for a related small side-project, my mind went back to the classic LucasFilm Games "The Secret of Monkey Island" videogame. The hero, Guybrush Threepwood, finds a grog vending machine while trying to buy a ship.

"The Secret of Monkey Island". Money well spent in 1993.
I loved the idea of a pirates with humorously anachronistic vending machines. That, combined with memories of last month's trip to Tokyo somehow merged into "Miniature Pirate Gachapon Machine". The machine could dispense prizes that are relevant to pirates!

LEARNING FROM A YOUTUBE TUTORIAL

Thanks to YouTube, one can find several DIY videos on how to make a gachapon machine. I got most of my inspiration from the user "Polymomo Tea" and his polymer clay tutorial here:

DIY Miniature Clay Toy Capsule/Gashapon Machine Tutorial 

Once I saw his video, I understood the necessary mechanisms to make it work. I prefer working with wood, since I find it sturdier. Wood also looks more rustic and period-appropriate for the Pirate Age.

BUILDING THE MACHINE

A trip to the hobby shop solved my problem about what to use for the glass display. They have these small acrylic display cases that are about 1" x 1" x 3". That was the only item I needed to purchase specially for the pirate gachapon machine project. The rest of the supplies like wood, cardstock, Halloween bracelets and beads were already sitting around the house.

Work in progress- Parts
Parts:

1) Sawed-off acrylic plastic case with original lid
2) Custom plywood box to hold the gachapon mechanism. Note the slanted floor (to coax the prizes to roll downwards to the dispenser)
3) Replacement wooden lid for acrylic case
4) Wooden base made from popsicle sticks
5) Tumbler to rotate, pick up a prize and dispense it. Tumbler was made from cardstock, wrapped around a pen, glued and sealed with several coats of acrylic sealer. Two wooden pegs were attached to the ends.
6) Wooden triangle wedge to guide the downward motion of the prizes
7) Wooden knob to turn

Here's a view of the box mechanism:


Here's a view of the dry-fit of the parts:


I created a gachapon header card using Photoshop, combining various pieces of clipart mooched from the Internet. I printed them in several sizes until I found the size that worked.


Here's the header card. I was unable to cut/paste Japanese characters into Photoshop, so I ended up pasting them into Notepad, increasing the font size to 96 points and doing a print screen. Then I pasted the Japanese characters as a graphic into Photoshop. The top says "Pirate Gachapon". The text in the middle says "You can win a gold pirate doubloon!" and the bottom has the various warnings about not for children under 3 years old. At least that's what Google Translate tells me. I hope it's right.

Pirate Gachapon Header Card graphic
The prizes: 1) A skull, from a skull bracelet. I used a Dremel tool to grind them down to make them somewhat more round 2) A bomb. Made from a round bead, with a wick added, painted black and sealed with matte acrylic 3) A whale tooth. Cut from plastic teeth in a Halloween bracelet. 4) Pieces of Eight in a capsule.


There are miniature gachapon machines on ebay, for themes such as Disney, Angry Birds, Dragonball-Z, and Pokemon. I could have bought one and modified it, but I like the challenge of scratch-building. The mini-machines have a large matching theme figurine on the top, so I copied that idea and added a skull (from a Halloween bracelet) for the top of my DIY machine. I added an eyepatch and bandanna to make it look more pirate-y.


The dimensions of the machine is 1.25" x 1.25" x 2.25". It is around 1:12 scale... I could have made it smaller, but I really wanted it to dispense the little skulls, so I had to make it the appropriate size. The mechanism is not 100% reliable- since the prizes are not exactly round, they sometimes jam in the hopper.


Here's the completed Miniature DIY Pirate Gachapon Machine! It took about 4 days, as there was a learning curve, and I also needed to do the Photoshop graphics and write a blog page too.


FUN WITH FIGURES AND THE GACHAPON MACHINE

Here's what the DIY Pirate Gachapon machine looks like with various action figures. Kaiyodo's Dokuroman skeleton bangs on the machine, hoping to get a skull. He hopes that someday, the machine will dispense whole skeletons.


In the next picture, I placed an October Toys skeleton, and a Figma Archetype "She" figure for scale. The gachapon machine is relatively in-scale for figures of this size (about 5").

Figma Archetype "She" and October Toys skeleton with gachapon machine

SECOND MACHINE- A QUICK BUILD

Most of the time, real gachapon machines are sighted in multiples. Since I already had all the tools out and the hard-earned know-how about building them, I decided to build a second gachapon machine. This one is intentionally non-functional, saving me the time and trouble of exacting measurements. I also cut a lot of the build time by switching to basswood instead of using plywood. Basswood is so soft that it can be cut with a utility knife, instead of a saber saw or X-acto razor saw and miter box.

Instead of needing to carve triangular wedges out of wood, I used strips of painted cardboard for the ramps.  The non-functional tumbler is simply a split wooden dowel, with a partial hole ground into it using a Dremel tool. The header cards and machine signs were already made in Photoshop, so all I needed to do was print another set.

non-functional gachapon machine
Once everything was painted, stained and varnished, the second gachapon machine (which took only one day to make) looks a lot like the first.


RELATED PAGES:


Pirate Hats (for action figures) DIY Tutorial
"Captain Bar" DIY Dollhouse becomes Pirate Bar
The Search for Dokuroman
Toy Shopping in Tokyo's Akihabara and Hong Kong's Mong Kok district 
A Collection of Toy Skeletons
More Gacha-Love, shipped from Japan!  
Tokyo's Akihabara Again and Gacha-Love, 2017