|
| Free Akihabara map with my favorite shops marked (click to enlarge) |
Well, it's 11 months after my first trip to Tokyo in 2016, and I went back! I was in Shanghai, and since I had to put up with a 13 hour flight to get there, it made sense to also go back to Japan for a few days. This time, I padded additional days to the trip for shopping! I had a glorious time!
DAY 1: GACHAPON KAIKAN, HAVI KORO, KAIYODO HOBBY LOBBY
 |
| Gachapon Kaikan and one of their display cases |
On the first day, I had about 4 hours to shop, so I (of course) went to Akihabara, via the Tokyo Metro. First stop was, of course, Gachapon Kaikan! I had plenty of time to take some photos, and look at all the gacha machines, as well as explore the other floors. Gachapon Kaikan still had Rement Pose Skeletons for sale, and for only 500 Yen ($4.35). They had the Oden stall on display, but it was sold out. When I went back a few days later, they restocked, so I got the Oden stall for only 1300 yen (around $12.00)!
 |
| Inside Gachapon Kaikan |
I saw gacha machines of the recent Epoch robot series, this time with a rickshaw. I tried twice, and got two different colored Epoch robots, but no rickshaw. Something new that caught my eye were these Bandai figures. All I could read was "SAGA", "500 yen" and "125mm" and a backing card that indicated that these figures were highly poseable. They had me at "125mm", because it's an odd scale, and my favorite size for figures (1:15). About 30 seconds after I got mine, someone else peered at the machine and bought one. More on these later.
 |
| 2 gacha machines at Gachapon Kaikan |
 |
| Pose skeleton and Oden stall @ Gachapon Kaikan |
 |
| Kamen Rider @ Gachapon Kaikan |
|
|
 |
| Epoch robots @ Gachapon Kaikan |
Next was a hike to the Radio Kaikan building, to check out Kaiyodo Hobby Lobby, and my favorite open package gacha scalper shop, Havi Koro Toy. I bought the rickshaw there, for 350 yen, only a 50 yen markup. Also picked up 2 folding chairs from the Epoch "Interrogation" series, because one can never have enough folding chairs, and they're no longer available on Rakuten ToySanta.
 |
| Rickshaw and folding chairs @ Havi Koro |
 |
| Kaiyodo Hobby Lobby at Radio Kaikan Bldg |
Kaiyodo still had the Dokuroman skeletons in their machines, both the DEVGRU (ver 2) and the Halloween Nightmare. I decided to buy 2 more of the Halloween ones, because they're so good and are a definite improvement over the original DEVGRU (ver 1) ones. On the 2nd floor of the Radio Kaikan bldg, there was a bank of gacha machines, and I noticed that the 125mm SAGA figures were sold out there. Hmmm, interesting. Perhaps they're in high demand?
 |
| Gacha machines at Kaiyodo Hobby Lobby |
 |
| Skeletons in different sizes, Kaiyodo Hobby Lobby |
 |
| Kaiyodo Pumpkin Nightmare skeletons @ Kaiyodo Hobby Lobby |
On the way back to Suehirocho Station, I stopped by several shops and even went into dark alleyways to check out the gacha. I came across these Epoch luggage cases. For only 200 yen and the backing card showed that they
open. Oh hell, why not? I scored a white one. Another gacha machine on the street that got my attention was... some sort of "horror hands reaching from the grave" gacha. It was just weird enough to convince me to part with 200 yen for a capsule. I got 4 horror hands (1:6 scale) and a gravestone. With all the toy skeletons that I have already, I could always use a gravestone.
 |
| Suitcases and Horror Hands gacha machine |
By 21:00, the gacha shops were closed, so it was time to head back to the hotel. I opened up the SAGA figure, and found out that it's from a "Kamen Rider" series. And sure enough, the figure was truly 125mm, and had amazingly good articulation and paint apps for something that cost less than $5.00. I counted 21 POA, and the figure was large and sturdy enough to not have the ball joints pop off. The full name of the series is フルアクションフィギュアSAGA 仮面ライダー, which roughly translates into "
Fully poseable action figure SAGA Kamen Rider". I agree that they're pretty damn good. We just don't get figures of this quality at that price in the States.
At my hotel (Hotel East 21), there's a small shopping mall, and a pharmacy which had a decent number of gacha machines. They had the Kamen Rider gacha there, and I bought a few more, since it was so convenient.
 |
| Gacha machines at Hotel East 21 mall pharmacy |
 |
| Gacha machines at Hotel East 21 mall pharmacy |
 |
| Kamen Rider Kuuga @ Hotel East 21 mall pharmacy |
I spent the next 2 days at Tokyo Disneyland and Tokyo DisneySea. I'm slightly disappointed that Disney doesn't know how to properly exploit the pirates over there. The 2 pirate shops had generic pirate merchandise- the unbranded types that they could simply order from China. Nothing that was associated with the park, or the ride.
 |
| Bon Voyage at Maihama Station, like the "World of Disney" stores |
DAY 4: BON VOYAGE, AKIBA CULTURE ZONE, YODOBASHI AKIBA and VOLKS HOBBY PARADISE
Several days later, I had a complete day (Saturday) to go shopping, so I took the hotel shuttle to Tokyo Disneyland just to shop at "Bon Voyage", the official Disney Parks store at Maihama Station. Then, I headed back to Akihabara. This time, I had the Akiba Culture Zone and Yodobashi Akiba on my list to check out. At the Akiba Culture Zone, there was another branch of Havi Koro Toy. I didn't see anything I desperately wanted, so I headed to Yodobashi Akiba. It's on the other side of the JR Akihabara station, and this time, I had a smartphone to guide me.
 |
| Yodobashi Akiba |
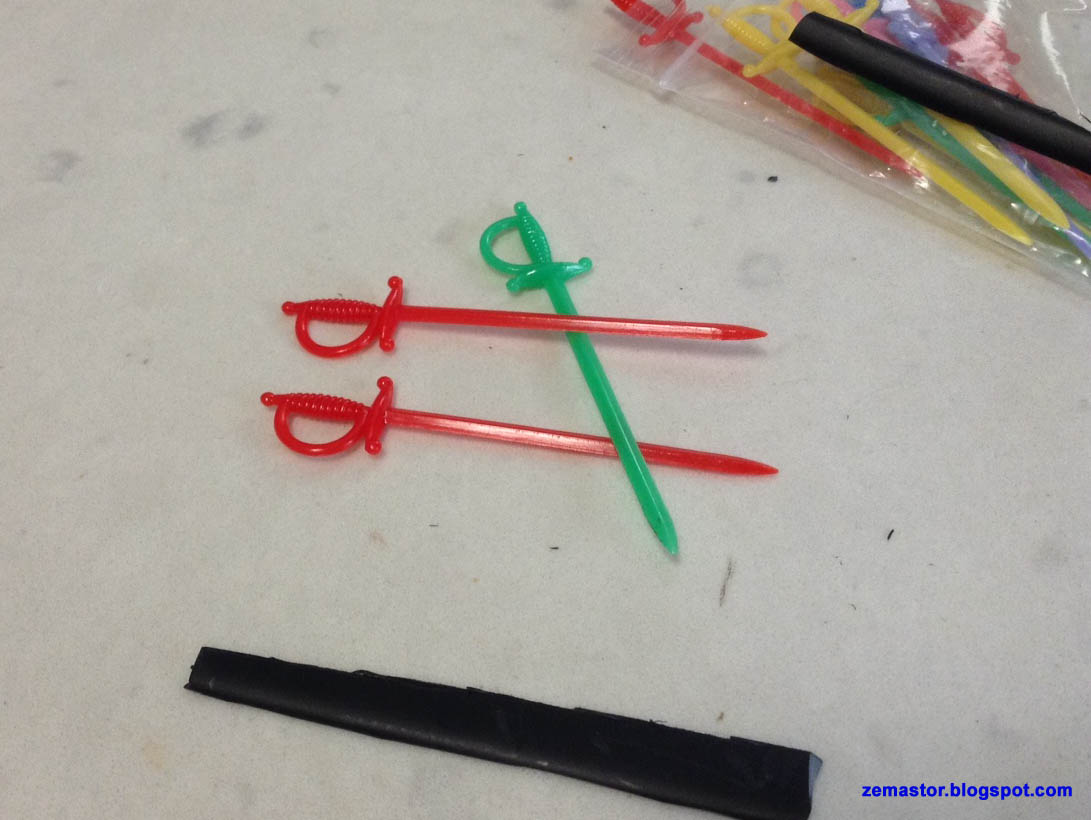
This is Yodobashi Akiba. It's HUGE. I spent my time mainly on the toys floor. They have multiple large banks of gacha, and aisle after aisle of toys, including the most comprehensive collection of Rement Pose skeleton items that I had ever seen! I picked up the Pose Skeleton sword set and the Oden stall, although I eventually returned the Oden stall because Gachapon Kaikan had a better price. Yodobashi Akiba's gacha included a few from last year (2016) while Gachapon Kaikan seems to stock the latest. By Sat, on my final trip to Gachapon Kaikan, they were sold out of the Kamen Rider 125mm figures.
 |
| Pose Skeleton display at Yodobashi |
 |
| Gachapon machines at Yodobashi Akiba |
I used the opportunity at Yodobashi to pick up a samurai armor gacha, and some of the Epoch exercise barbells.
 |
| Samurai armor and barbells gacha machines at Yodobashi Akiba |
 |
| Samurai armor and barbells @ Yodobashi Akiba |
 |
| Pose Skeleton sword set @ Yodobashi Akiba |
|
My last stop was Volks Hobby Paradise, in order to pick up one of the Japanese Billy dollhouses. I took a picture of some of the ones they had in the glass case, already built. The Ramen stall was larger than I expected, but I wasn't really planning on spending 3000 yen ($27) for one since I already made an imitation version for 1/10 the cost.
 |
| Volks Hobby Paradise in Akihabara |
 |
| Pre-built, display only Billy dollhouses at Volks |
 |
| Billy dollhouses for sale at Volks |
|
|
I spent a LONG TIME looking at the packages of the larger kits, pondering which one I wanted to buy. I really wanted the Unagi shop, because I really like unagi in sushi and rice bowls, but the only one they had was built-up in the display case. I was determined to go home with a Billy kit, so I eventually decided on the Kushikatsu (deep fried skewers) shop. Volks is a duty-free store, so foreign tourists can avoid paying the Japan 8% consumption tax on total purchases over 5000 yen. The Kushikatsu dollhouse was 5300 yen (about $48). I will be doing a separate write up on this kit later.
 |
| Billy dollhouse Kushikatsu shop, purchased at Volks |
The Billy dollhouse website is here:
http://www.billy-doll.co.jp/?mode=cate&cbid=1300112&csid=0
You can use Google translate to get this translated into English. However, they do not ship to the United States, so you'd need to order these from Amazon.Com.
DAY 5: NARITA INTERNATIONAL AIRPORT
My final day in Tokyo was short. I had an early afternoon flight. There's an overwhelming number of transportation options available to get to/from the airport. Just to make it easier on my nerves, I opted to take the "A" Toei Asakusa line from Nihombashi Station, and just stayed on the same train when it became the Narita SkyAccess Express.
 |
| Some transportation options out of Narita Airport |
Ah, but once I got to Narita airport, got my boarding pass and checked the luggage, there was still more gachapon machines to peruse. This has to be new... gacha machines at the Narita airport. Travelers on the way home, with leftover yen in their pockets, time to kill, and perhaps a need to buy a bunch of little souvenirs for the folks back home are the perfect marks. Kaiyodo seems to have a good presence there. They managed to have a display of Kaiyodo gacha under a plastic dome. The idea is complete genius! It can also serve people coming home from other parts of Asia with a layover at Narita airport for a few hours. I really love that idea.
 |
| Kaiyodo gacha display at Narita airport |
 |
| Gacha at the Narita airport |
 |
| Gacha at the Narita airport |
RELATED PAGES:
The Search for Dokuroman
Miniature DIY Pirate Gachapon Machine
A Collection of Toy Skeletons
More Gacha-Love, shipped from Japan!
Toy Shopping in Tokyo's Akihabara and Hong Kong's Mong Kok district